Rustic No-Knead Rosemary Garlic Bread: The Ultimate Artisan Loaf for Home Bakers
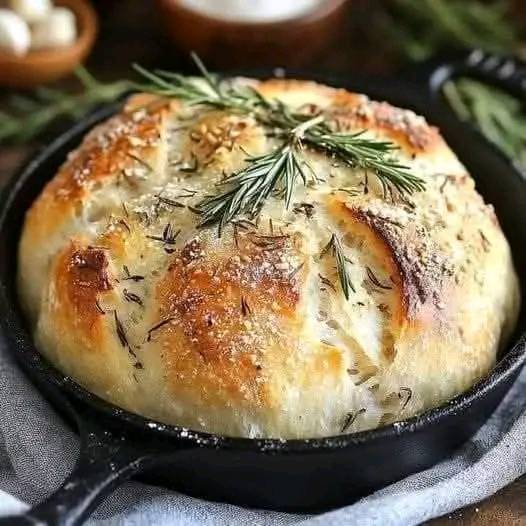
There’s nothing quite like the earthy aroma of rosemary and roasted garlic wafting through your kitchen as a rustic artisan bread bakes to perfection in a Dutch oven. This no-knead rosemary garlic bread is a showstopper — with a crackling golden crust, tender, chewy crumb, and an unbeatable depth of flavor — all achieved with minimal effort and no mixer required.
Whether you’re an experienced baker or a novice, this recipe offers a foolproof path to bakery-style results right in your own home. Let’s dive into this incredibly detailed, step-by-step guide to creating the best rustic no-knead bread infused with rosemary and garlic.
Why This No-Knead Rosemary Garlic Bread Works So Well
The secret behind the success of this bread lies in the long fermentation period. By allowing the dough to rest for 12 to 18 hours, the yeast slowly ferments the flour, building deep, complex flavors that kneading can’t replicate. The Dutch oven creates a steam-filled environment, which yields a shatteringly crisp crust while preserving a soft, open interior.
This method is based on the Jim Lahey-style no-knead technique but elevated with herbaceous rosemary and savory roasted garlic for maximum flavor.
Ingredients for Artisan Perfection
You’ll need just a handful of simple pantry staples and fresh herbs to craft this stunning loaf:
- 3 cups (360g) all-purpose or bread flour
- 1 ¾ teaspoons (7g) kosher salt
- ½ teaspoon (2g) instant or active dry yeast
- 1 ½ cups (350g) warm water (about 100°F/38°C)
- 2 tablespoons fresh rosemary, finely chopped
- 3-4 cloves garlic, roasted and mashed into a paste
Tip: If using dried rosemary, reduce the quantity to 2 teaspoons, as dried herbs are more concentrated.
How to Roast Garlic for Bread
Roasted garlic transforms this bread into something truly special. Here’s how to do it:
- Preheat your oven to 400°F (200°C).
- Slice the top off a whole garlic bulb, drizzle with olive oil, and wrap in foil.
- Roast for 35-40 minutes until golden and soft.
- Squeeze the roasted cloves out of their skins and mash into a smooth paste.
Step-by-Step Instructions: No-Knead Artisan Bread
1. Mix the Dough
In a large mixing bowl, combine:
- Flour, salt, and yeast. Stir with a whisk to evenly distribute.
- Add the warm water, chopped rosemary, and roasted garlic paste.
Mix with a wooden spoon or silicone spatula until a shaggy, sticky dough forms. Ensure there are no dry patches of flour.
2. Let the Dough Rise (Bulk Fermentation)
- Cover the bowl with plastic wrap or a tight-fitting lid.
- Leave it at room temperature (ideally around 70°F/21°C) for 12 to 18 hours.
The dough should become bubbly and doubled in size, indicating that fermentation has developed flavor and structure.
3. Shape the Dough
- Dust a clean surface with flour.
- Turn the dough out gently to avoid degassing.
- With floured hands, fold the dough edges toward the center, forming a rough ball.
- Place the shaped dough seam-side down onto a floured piece of parchment paper.
Cover loosely with a clean kitchen towel or plastic wrap and let it rise for 1 to 2 hours, until puffy.
4. Preheat Your Oven and Dutch Oven
- Place a Dutch oven (with lid) into your oven.
- Preheat to 450°F (230°C) at least 30 minutes before baking to ensure even heat retention.
5. Bake the Bread
- Remove the Dutch oven carefully.
- Using the parchment as a sling, lower the dough into the pot.
- Cover and bake for 30 minutes.
- Remove the lid and continue baking for 15 to 20 minutes more, until the crust is deep golden brown and crackly.
6. Cool Before Slicing
Transfer the loaf to a wire rack and let it cool completely for at least 1 hour before slicing. This prevents the interior from becoming gummy and allows the crumb to set properly.
Expert Tips for Perfect Rustic No-Knead Bread
Use Bread Flour for Extra Chew
While all-purpose flour works well, bread flour gives this loaf a more chewy, elastic crumb due to higher protein content.
Don’t Rush the Fermentation
Long fermentation develops natural sweetness and umami. If your kitchen is cold, let the dough rest in a switched-off oven with the light on.
Preheat the Dutch Oven Thoroughly
The intense initial heat jumpstarts oven spring and creates a steam-rich environment for a blistered crust.
Flavor Variations
This bread is a versatile canvas. Try folding in:
- Chopped Kalamata olives
- Sun-dried tomatoes
- Grated Parmesan
- A swirl of pesto for Italian flair
Troubleshooting Common Issues
Why didn’t my dough rise?
This is often due to expired yeast or cold ambient temperature. Use fresh yeast and try fermenting in a warmer location.
Why is my bread dense?
Under-proofing or over-proofing can cause density. Aim for a jiggly, puffy dough before baking.
Why is the crust too hard?
Ensure your Dutch oven is covered during the first phase of baking. If needed, wrap the bread in a clean towel post-bake to soften the crust slightly.
Storage and Freezing Tips
Short-Term Storage
Store bread at room temperature wrapped in a tea towel and placed inside a paper or plastic bag. This keeps the crust crisp for up to 2 days.
Long-Term Storage
- Slice and place in an airtight freezer-safe bag.
- Freeze for up to 3 months.
- Toast or reheat slices directly from frozen for fresh flavor.
Serving Suggestions
- Serve warm with olive oil and balsamic vinegar
- Pair with soups, stews, or pasta
- Make next-level grilled cheese or paninis
- Toast and top with avocado, eggs, or smoked salmon
FAQs
Can I double the recipe?
Yes, but divide the dough into two loaves and bake separately for best results.
Can I make this gluten-free?
While no-knead bread works with some gluten-free flours, results will vary. Use a trusted gluten-free artisan bread blend.
Can I use sourdough starter instead of yeast?
Absolutely. Substitute ¼ cup of active sourdough starter and reduce the water slightly. Fermentation may take longer.
Conclusion: A Must-Try for Bread Lovers
This rustic no-knead rosemary garlic bread is more than just a loaf — it’s a culinary experience that fills your home with warmth and flavor. With minimal effort and no special equipment, you can achieve the kind of bread that turns simple meals into memorable feasts. Whether enjoyed fresh out of the oven or toasted with butter the next day, this artisan loaf is sure to become a household favorite.